Core Image のフィルタを利用すれば、画像に最近流行のトイカメラのようなエフェクトを簡単に施せるようになります。簡単な利用方法は「AppleScript + Core Image」で触れました。今度は Core Image の顔検出を利用してみましょう。
「AppleScript + Core Image」で利用した CoreImage.scptd ライブラリを拡張します。
このファイルを ~/Library/Script Libraries に保存しておいてください。
顔の検出は CIDetector で行います。 CoreImage.scptd の property に CIDetector を追加します。
property CIDetector : class "CIDetector"
顔の検出の手順は
- 検出器を作成/設定
- 検出器に画像を渡す
検出器は検出器の種類といくつかのオプションを指定して作成します。検出器の種類は現在のところ「人の顔」だけです。オプションには検出器の精度があります。精度は CIDetectorAccuracyLow と CIDetectorAccuracyHigh がありますが、前者は速度重視、後者は速度を犠牲にして正確さ重視になっています。
iOS ではどうか分からないのですが、どちらでも違いがあまり分かりませんでした...。
では作ってみましょう。
Script Editor で開く
on faceDetect(imageRef)
    -- 検出器のオプションを NSDictonary で作成
    set opts to {CIDetectorAccuracy:(current application's CIDetectorAccuracyHigh)}
    -- 検出器をオプションとタイプを指定して作成
    set detector to CIDetector's detectorOfType:(current application's CIDetectorTypeFace) context:(missing value) options:opts

    -- 顔の検出を行う際のオプションを NSDictonary で作成
    set opts to {CIDetectorImageOrientation:(imageRef's |properties|()'s valueForKey:"Orientation")}

    -- 顔検出を実行
    set faceList to detector's featuresInImage:imageRef options:opts

    -- 検出された顔の位置とサイズをログに出力
    repeat with i from 1 to count faceList
        set face to item i of faceList
        log ((i as text) & ": 検出")
        log (face's |bounds|())
    end repeat

    return faceList
end faceDetect
検出器を作成し、そのまま顔検出を行っています。検出は CIDetector の featuresInImage:options: メソッドで行います。このときに指定するオプションは画像の向き、まばたきの検出、笑顔の検出が指定できます。大事なのは画像の向きでこれが正しくないと検出が正確に行えません。
まばたきと笑顔は OS X Mavericks 以降でしか利用できません。
AppleScript としての注意点ですが、本来ならオプションは NSDictionary で作成します。が、ここでは AppleScript の record で代用しています。互換性がある...というわけではないのですが、代替として利用できます。
これは NSArray と AppleScript の list でも同様で、上記でも NSArray として返ってくる検出の結果を AppleScript 的に繰り返しで処理しています。
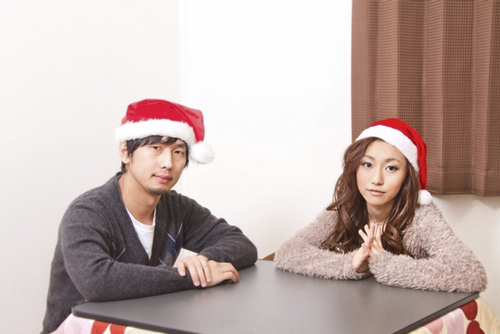
ここまでで顔検出が行えますのでいったんテストしてみましょう。テストで利用するのは以下の画像です(photo by pakutaso.com )。

ちょっと時期外れのサンタさんです。
Script Editor で開く
on run
    set inputFile to choose file of type {"public.jpeg"}

    tell script "CoreImage"
        set imageRef to openImageFile(POSIX path of inputFile)
        set faceList to faceDetect(imageRef)
    end tell
end run
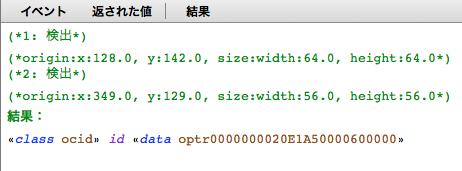
顔が写っている画像を選択して実行してみてください。顔が検出されれば、AppleScript Editor のログに結果が表示されます。

うまく検出できているでしょうか?
顔の範囲が分かったら顔だけを切り抜いたり、様々なフィルタをかけることができます。
試しに Core Image Programming Guide にある Anonymous Faces Filter Recipe を AppleScript に移植してみましょう。このサンプルは検出された顔に対してモザイクをかけるものです。引き続き、先ほどのサンタさんの画像を使います。
やることは以下の通り。
- オリジナルの画像をモザイクにする
- 検出した顔の部分以外を黒く塗りつぶしたマスク画像を作る
- オリジナルの画像、モザイクをかけた画像、マスク画像を重ね合わせる
まず、新しく利用するクラスを追加します。
property CIColor : class "CIColor"
property CIVector : class "CIVector"
そして、以下のハンドラを追加。
Script Editor で開く
on max(a, b)
    -- 大きい方の値を返す
    if a > b then return a
    return b
end max

on min(a, b)
    -- 小さい方の値を返す
    if a < b then return a
    return b
end min

on faceMask(imageRef)
    -- 顔の部分のマスクを作成
    set faceList to faceDetect(imageRef)
    if (count faceList) is 0 then return missing value

    -- 顔の範囲を緑の円で、それ以外を黒で塗りつぶす
    set maskImage to missing value
    repeat with face in faceList
        set centerX to (face's |bounds|()'s origin's x) + ((face's |bounds|()'s |size|'s width) / 2.0)
        set centerY to (face's |bounds|()'s origin's y) + ((face's |bounds|()'s |size|'s height) / 2.0)
        set radius to (min(face's |bounds|()'s |size|'s width, face's |bounds|()'s |size|'s height)) / 1.5

        set faceCenter to current application's NSMakePoint(centerX, centerY)

        set radialGradient to filterWithName("CIRadialGradient")
        (radialGradient's setValue:radius forKey:"inputRadius0")
        (radialGradient's setValue:(radius + 1.0) forKey:"inputRadius1")
        (radialGradient's setValue:(CIColor's colorWithRed:0.0 green:1.0 blue:0.0 alpha:1.0) forKey:"inputColor0")
        (radialGradient's setValue:(CIColor's colorWithRed:0.0 green:0.0 blue:0.0 alpha:1.0) forKey:"inputColor1")
        (radialGradient's setValue:(CIVector's vectorWithCGPoint:faceCenter) forKey:"inputCenter")

        set circleImage to (radialGradient's valueForKey:"outputImage")

        if (missing value is maskImage) then
            copy circleImage to maskImage
        else
            -- 複数の顔が検出されたら作成したマスク画像を重ね合わせる
            set filter to filterWithName("CILightenBlendMode")
            (filter's setValue:circleImage forKey:"inputImage")
            (filter's setValue:maskImage forKey:"inputBackgroundImage")
            set maskImage to (filter's valueForKey:"outputImage")
        end if
    end repeat

    return maskImage
end faceMask

on anonymousFacesFilter(imageFile)
    (* 顔にモザイクをかけた画像を作成する *)
    set imageRef to my openImageFile(imageFile)

    set imageRect to imageRef's extent()
    set {w, h} to {imageRect's |size|'s width, imageRect's |size|'s height}

    -- モザイク画像を作る
    set pixellate to filterWithName("CIPixellate")
    pixellate's setValue:imageRef forKey:"inputImage"
    pixellate's setValue:((max(w, h)) / 60) forKey:"inputScale"

    -- 顔だけを除外するマスク画像を作成する
    set maskImage to faceMask(imageRef)

    -- CIBlendWithMask フィルタでモザイクとオリジナル、マスクを重ねる
    set blend to filterWithName("CIBlendWithMask")
    blend's setValue:(pixellate's valueForKey:"outputImage") forKey:"inputImage"
    blend's setValue:imageRef forKey:"inputBackgroundImage"
    blend's setValue:maskImage forKey:"inputMaskImage"

    return blend's valueForKey:"outputImage"
end anonymousFacesFilter
ライブラリを保存したら、次のように利用します。
Script Editor で開く
on run
    set inputFile to choose file of type {"public.jpeg"}

    tell script "CoreImage"
        set imageRef to anonymousFacesFilter(POSIX path of inputFile)
        set outputFile to POSIX path of (choose file name default name "Untitled.jpg")
        saveAsJPEG(imageRef, outputFile)
    end tell
end run
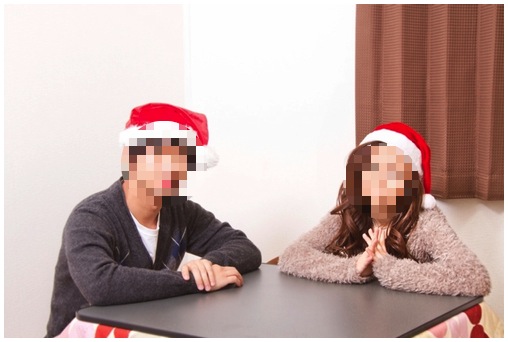
結果は以下のように顔の部分だけモザイクになっています。

CIFilter には他にも色々なフィルタが用意されています。また、CIImage には property メソッドがあり、画像のメタデータにアクセスすることも可能です。GPS を読み取って Map アプリでその場所を開くなんてこともできます。こういったことは Image Events 単体ではできないことなので重宝するのではないかと。


